Just to be clear, let's remind you that this part is about configuring the BACnet client, ie "reading" values from the BACnet server. (Of course, the client can also write to objects and properties that support writing.) It is important that the operation is initiated by the client. In order for the PLC as a client to be able to ask the server about specific objects and properties, we must enter these values as parameters of individual communication data points in the Merbon IDE when creating the application.
When defining variables, we proceed similarly to other communication protocols: first we create a communication channel in the PLC:
Fig. Establishment of a BACnet channel in the Merbon IDE
For the channel, fill in only the name, enable it (Enable = True), select the BACnet protocol and select (as the only option) the UDP transport protocol.
We insert the device into the channel.
Fig. Establishment of BACnet device in Merbon IDE
These settings apply to the Device object, it is the base object on the device with which we will communicate. In its parameters we specify the Device object instance in the BACnet server, usually 1, and the network address type - None. Other types of network addresses are ready for future expansion for other communication media. The UDP parameters contain the IP address of the BACnet server and its UDP port. The local port is assigned automatically if 0 is entered. We change the local port number only if the server requires it, see above.
Gig. UDP ports for BACnet communication. The client is PLC Domat with Merbon Runtime.
The next step is to define a group of I/O points:
Fig. Establishment of the BACnet Group in the Merbon IDE
Practically nothing essential is set in the group except the type (here Read Only), it only serves as a "container" for I/O points. For other protocols, some common properties of the contained I/O points are usually defined in the group.
Next, you can define individual I/O points:
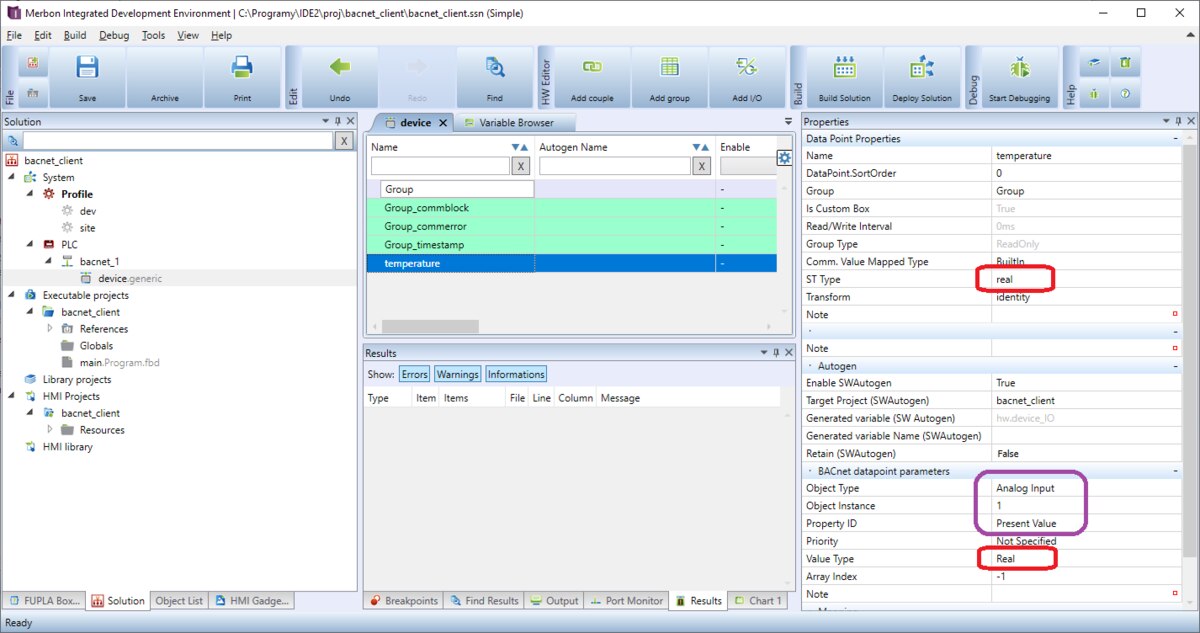
 Fig. Creating an I/O point in the Merbon IDE
The basic parameters are Object Type and Object Instance. We will learn these values just by examining the server or they will be provided by the supplier in the form of a table. In most cases, the Property ID will be the Present Value. The value type is basically determined by the object type and by the property - for analog inputs, outputs and values, it will be Real type for the current value. For standard properties, the type is predefined, so it cannot be confused. The same type must be selected at the top in ST Type (marked in red).
In order to automatically create a global variable for the I/O point in the PLC, we check whether the Autogen function is enabled and whether the current project in the PLC is selected as the target project.
We will not deal with other parameters now, we can add other I/O points - or we will compile the project, upload it to the PLC and test how it communicates:
Fig. Successful communication with BACnet server
For study reasons, we can also look at communication through Wireshark. But it will only work if we use Merbon Runtime on Windows on the same PC as Wireshark instead of PLC. Why?
It is because the switch that optimizes communication on the network and always sends packets only to its ports (connectors), which are behind the destination addresses. If the switch is connected to a BACnet server device on one port, a BACnet client on the second PLC port, and a Wireshark notebook on the third port, BACnet communication takes place only between the first and second port. To scan packets, we would have to use either a hub - an older device that copies all traffic to all its other ports, or a configurable switch set to send all data from the other ports to one of the ports.
So successful communication looks like this:
Fig. Reading the analog value of BACnet in Wireshark
We can see that the client uses the Read Property Multiple service - to read more values (although only one has yet to be defined in the PLC). In the telegram of the response (from server to client) we can trace the Present Value, in the Real format (highlighted in blue at the bottom). The rising number after the service name (123...129) is the so-called Invoke ID, which the server copies into the response so that the client is able to match responses to the sent queries. In the next section, we will write down the values.